Friday, November 18, 2011
Recuva to Recover That Deleted File

Recuva is a new file recovery tool that will unerase files that you have mistakenly deleted from your computer. It's fast, small and will run from a USB drive. It also supports most digital cameras card formats, so you can restore those images you accidentally deleted!
Turn off any applications you don't need, if you are trying to recover files from a media card, stop using that card immediately. Ideally install Recuva before you need it, as just browsing the internet and downloading the installer creates a huge number of temporary files and any one of them could over write the file you are trying to recover. When you need it, just Scan the drive the file was on.
System Requirements
Runs on Microsoft Windows 7, Vista, XP, 2003, 2000 and 98. Including both 32-bit and 64-bit versions.
v1.32.444 (30 Oct 2009)
- Improved analysis of exFAT drives.
- Added U3 portable installer.
- GUI fixes for non-standard DPI (large fonts).
- Improved error messages for files that cannot be overwritten.
- Dropped support for Windows 98 to improve performance.
- Fixed bug in language selection.
- Minor bug fixes.
donload
http://www.mediafire.com/?2imnhnmjwf4
How to Install Windows 7
Step 1 - Place Windows 7 DVD in your dvd-rom drive and start
your PC. Windows 7 will start to boot up and you will get the following
progress bar.
Klik Di Sini Untuk Zoom Gambar

Step 2 - The next screen allows you to setup your language, time and currency format, keyboard or input method. Choose your required settings and click next to continue.
Klik Di Sini Untuk Zoom Gambar

Step 3 - The next screen allows you to install or repair Windows 7. Since we are doing a clean install we will click on "install now".
Klik Di Sini Untuk Zoom Gambar

Step 4 - Read the license terms and tick I accept license terms. Then click next to continue.
Klik Di Sini Untuk Zoom Gambar

Step 5 - You will now be presented with two options. Upgrade or Custom (Advanced). Since we are doing a clean install we will select Custom (Advanced).
Klik Di Sini Untuk Zoom Gambar

Step 6 - Choose where you would like to install Windows 7. If you have one hard drive you will get a similar option to the image below. You can click next to continue. If you have more that one drive or partition then you need to select the appropriate drive and click next. If you need to format or partition a drive then click Drive options (advance) before clicking next.
Klik Di Sini Untuk Zoom Gambar

Step 7 - Windows 7 starts the installation process and starts copying all the necessary files to your hard drive as shown on the image below.
Klik Di Sini Untuk Zoom Gambar

Step 8 - It will go through various stages of the setup and will reboot your system few times.
Klik Di Sini Untuk Zoom Gambar

Step 9 - When your PC reboots it attempts to boot from DVD as its the first boot device. Do not press any key during the boot prompt so Windows 7 will continue with the installation by booting from the hard drive.
Klik Di Sini Untuk Zoom Gambar

Step 10 - After the reboot your computer will be prepared for first use.
Klik Di Sini Untuk Zoom Gambar

Step 11 - At this stage you need to choose a user name and computer name. Click next to continue. The user account you create here is the Administrator account which is the main account for your Windows 7 that has all the privileges.
Klik Di Sini Untuk Zoom Gambar

Step 12 - Choose your password and password hint just incase you forget your password and need to jog your memory.
Klik Di Sini Untuk Zoom Gambar

Step 13 - You can now type the product key that came with Windows 7 and click next. If you do not enter the product key you can still proceed to the next stage. However Windows 7 will run in trial mode for 30 days. You must therefore activate Windows within 30 days otherwise you can not access your computer after 30 days.
Klik Di Sini Untuk Zoom Gambar

Step 14 - Help protect your computer and improve Windows automatically. Choose Use recommended settings.
Klik Di Sini Untuk Zoom Gambar

Step 15 - Review your time and date settings. Select your time zone, correct the date and time and click next to continue.
Klik Di Sini Untuk Zoom Gambar

Step 16 - Select your computer's current location. If you are a home user then choose Home network otherwise select the appropriate option.
Klik Di Sini Untuk Zoom Gambar

Step 17 - Windows will now finalize the settings for your computer and restart.
Klik Di Sini Untuk Zoom Gambar

Step 18 - After the final restart Windows 7 will start to boot up.
Klik Di Sini Untuk Zoom Gambar

Step 19 - Finally you have the logon screen. Just type your password and press enter or click on the arrow to logon to Windows 7 for the first time.
Klik Di Sini Untuk Zoom Gambar

Step 20 - After you have logged on to Windows 7 for the first time, you will see similar desktop to the image below. At this point you can start using your computer. However it may not be fully configured. You need to make sure that all the hardware is detected correctly and the necessary device drivers are installed. This can be done from the device manager.
Klik Di Sini Untuk Zoom Gambar

Step 21 - To go to device manager click - Start Menu -> Control Panel -> System and Security -> System -> Device Manager. You will see all your hardware listed as shown on the image below. You need to check if you have any yellow exclamation marks next to the name of the devices, similar to "Multimedia Audio Controller" on the image below. This indicates that the driver has not been installed for this device.
At this stage you can install the driver for this device. To do so, Right Mouse click on Multimedia Audio Controller -> Update Driver Software...
Klik Di Sini Untuk Zoom Gambar

Step 22 - You can choose to "Search automatically for updated driver software" or "Browse my computer for driver software". If you have the driver CD or if the driver is on a USB drive then choose "browse my computer for driver software". Window 7 will search and install the driver from the CD or you can locate the driver manually.
Once you have removed all the yellow exclamation marks from the device manager your Windows 7 configuration would be fully complete.
Klik Di Sini Untuk Zoom Gambar

Step 23 - Finally check if you have successfully activated Windows 7. Click Start Menu -> Control Panel -> System and Security -> System. You will get a window similar to the image below. Towards the bottom you will see Windows is activated followed by your product ID. This shows that your copy of Windows 7 is fully activated.
Klik Di Sini Untuk Zoom Gambar

Klik Di Sini Untuk Zoom Gambar
Step 2 - The next screen allows you to setup your language, time and currency format, keyboard or input method. Choose your required settings and click next to continue.
Klik Di Sini Untuk Zoom Gambar
Step 3 - The next screen allows you to install or repair Windows 7. Since we are doing a clean install we will click on "install now".
Klik Di Sini Untuk Zoom Gambar
Step 4 - Read the license terms and tick I accept license terms. Then click next to continue.
Klik Di Sini Untuk Zoom Gambar
Step 5 - You will now be presented with two options. Upgrade or Custom (Advanced). Since we are doing a clean install we will select Custom (Advanced).
Klik Di Sini Untuk Zoom Gambar
Step 6 - Choose where you would like to install Windows 7. If you have one hard drive you will get a similar option to the image below. You can click next to continue. If you have more that one drive or partition then you need to select the appropriate drive and click next. If you need to format or partition a drive then click Drive options (advance) before clicking next.
Klik Di Sini Untuk Zoom Gambar
Step 7 - Windows 7 starts the installation process and starts copying all the necessary files to your hard drive as shown on the image below.
Klik Di Sini Untuk Zoom Gambar
Step 8 - It will go through various stages of the setup and will reboot your system few times.
Klik Di Sini Untuk Zoom Gambar
Step 9 - When your PC reboots it attempts to boot from DVD as its the first boot device. Do not press any key during the boot prompt so Windows 7 will continue with the installation by booting from the hard drive.
Klik Di Sini Untuk Zoom Gambar
Step 10 - After the reboot your computer will be prepared for first use.
Klik Di Sini Untuk Zoom Gambar
Step 11 - At this stage you need to choose a user name and computer name. Click next to continue. The user account you create here is the Administrator account which is the main account for your Windows 7 that has all the privileges.
Klik Di Sini Untuk Zoom Gambar
Step 12 - Choose your password and password hint just incase you forget your password and need to jog your memory.
Klik Di Sini Untuk Zoom Gambar
Step 13 - You can now type the product key that came with Windows 7 and click next. If you do not enter the product key you can still proceed to the next stage. However Windows 7 will run in trial mode for 30 days. You must therefore activate Windows within 30 days otherwise you can not access your computer after 30 days.
Klik Di Sini Untuk Zoom Gambar
Step 14 - Help protect your computer and improve Windows automatically. Choose Use recommended settings.
Klik Di Sini Untuk Zoom Gambar
Step 15 - Review your time and date settings. Select your time zone, correct the date and time and click next to continue.
Klik Di Sini Untuk Zoom Gambar
Step 16 - Select your computer's current location. If you are a home user then choose Home network otherwise select the appropriate option.
Klik Di Sini Untuk Zoom Gambar
Step 17 - Windows will now finalize the settings for your computer and restart.
Klik Di Sini Untuk Zoom Gambar
Step 18 - After the final restart Windows 7 will start to boot up.
Klik Di Sini Untuk Zoom Gambar
Step 19 - Finally you have the logon screen. Just type your password and press enter or click on the arrow to logon to Windows 7 for the first time.
Klik Di Sini Untuk Zoom Gambar
Step 20 - After you have logged on to Windows 7 for the first time, you will see similar desktop to the image below. At this point you can start using your computer. However it may not be fully configured. You need to make sure that all the hardware is detected correctly and the necessary device drivers are installed. This can be done from the device manager.
Klik Di Sini Untuk Zoom Gambar
Step 21 - To go to device manager click - Start Menu -> Control Panel -> System and Security -> System -> Device Manager. You will see all your hardware listed as shown on the image below. You need to check if you have any yellow exclamation marks next to the name of the devices, similar to "Multimedia Audio Controller" on the image below. This indicates that the driver has not been installed for this device.
At this stage you can install the driver for this device. To do so, Right Mouse click on Multimedia Audio Controller -> Update Driver Software...
Klik Di Sini Untuk Zoom Gambar
Step 22 - You can choose to "Search automatically for updated driver software" or "Browse my computer for driver software". If you have the driver CD or if the driver is on a USB drive then choose "browse my computer for driver software". Window 7 will search and install the driver from the CD or you can locate the driver manually.
Once you have removed all the yellow exclamation marks from the device manager your Windows 7 configuration would be fully complete.
Klik Di Sini Untuk Zoom Gambar
Step 23 - Finally check if you have successfully activated Windows 7. Click Start Menu -> Control Panel -> System and Security -> System. You will get a window similar to the image below. Towards the bottom you will see Windows is activated followed by your product ID. This shows that your copy of Windows 7 is fully activated.
Klik Di Sini Untuk Zoom Gambar
Wednesday, July 27, 2011
Beza Otak Pemikiran Laki dan Perempuan

Dalam kepala wanita ;
- umum tahu driving skills kebanyakkan wanita mmg worst
- memang punca sakit kepala
- membebel je keje
- tau salah ‘kita’ je!
- keperluan ditinggalkan kerana kemahuan!
- ingat nak shopping je
- pantang nampak benda berkilat
- kuat gosip
- sangat marah kalau kaum lelaki tak igt date² tertentu
eg : Birthday,anniversary dan lain lain - yang lain boleh rujuk gambar
.
Sekarang,kita pergi ke bahagian kepala otak lelaki pulak.

Dalam kepala lelaki ;
- Rajin segala bidang dalam rumah
- laki ni penyayang, sebab tu kami selalu mengalah
- kebolehan membawa manual transmision JAUHHHHHH lagi baik dari WANITA yang bajet bagus!
- Kami berfikir sebab SEX pun disebabkan kaum perempuan jugak!
- Yang buruk² pasal laki dalam diagram di atas tolong abaikan,tipu je tu.
Sunday, July 24, 2011
How to Crack Anybody's PC Password

1-Restart the PC
2-Before the Windows Boots Press F8
3-Select Safe Mode
4-Now you will Select the Administrator Account ""there shouldn't be any passes There""
5-When you Open it you will get a message . Click "Yes" and then Move On
6-Click "Start" and Then "Run"
7-Type "CMD" . and then you will enter the Command Port
8-type "Net User" . Now you will get the Users of the PC
9-to Change the Pass Type "Net User XXX *"... XXX= the User name
10-Type New Pass Word and Then Re-type It again and you are Ready to GO !
Thursday, July 14, 2011
wifi
On Windows 7 Box:
- Download and install Virtual Router or Connectify, you can try one of them. They are hardware specific so read the documentation on their websites about the supported WiFi devices.
- Fill in the settings panel with your prefered WiFi name, password and internet connection to share
- Click start button to start sharing
- On your Wireless Connection Status, click Details to get the network connection information, note the IPV4 Address

Virtual Router

Connectify

On Android Device
- Go to Settings -> Wireless & networks -> Wi-Fi Settings
- Open Advance settings menu
- Tick the Use static IP option
- Enter your desired IP address (ex: 192.168.2.2) into Ip Address field
- Enter your IPV4 Address (ex. 192.168.2.1) into Gateway field
- Enter 255.255.255.0 into Netmask field
- Enter your internet connection’s DNS server (use ipconfig /all command to get DNS info) into DNS 1 and DNS 2. As an alternative, you can use Google Public DNS: 8.8.8.8 and 8.8.4.4
- Connect to Wi-Fi using your password
- Disable and Enable Wi-Fi (in case if it won’t connect)
- Check the connection using browser or other application.

Wifi Static IP Setting

Android Wi-Fi
Thursday, July 7, 2011
Facebook Cookie Stealing And Session Hijacking

Three days ago I finished the series on Gmail Session Hijacking and Cookie Stealing , due to a tremendous response of readers I planned to write a post on Facebook cookie stealing and Session hijacking. Facebook session hijacking can also be accomplished via a very popular tool called Firesheep(On a Wifi Network Only), which I won't be explaining here because I have already written it before in my post Facebook Hacking Made Easy With Firesheep
In this tutorial I will explain you how an attacker can capture your authentication cookies on a local area network and use them to hack your facebook account, Before reading this tutorial I would recommend you to part1, part2 and part 3 of my Gmail Session Hijacking and Cookie stealing series, So you could have better understanding of what I am doing here.
- Gmail Cookie Stealing And Session Hijacking Part 1
- Gmail Cookie Stealing And Session Hijacking Part 2
- Gmail Cookie Stealing And Session Hijacking Part 3
Facebook Authentication Cookies
The cookie which facebook uses to authenticate it's users is called "Datr", If an attacker can get hold of your authentication cookies, All he needs to do is to inject those cookies in his browser and he will gain access to your account. This is how a facebook authentication cookie looks like:Cookie: datr=1276721606-b7f94f977295759399293c5b0767618dc02111ede159a827030fc;
How To Steal Facebook Session Cookies And Hijack An Account?
An attacker can use variety of methods in order to steal your facebook authentication cookies depending upon the network he is on, If an attacker is on a hub based network he would just sniff traffic with any packet sniffer and gain access to victims account.
If an attacker is on a Switch based network he would use an ARP Poisoning request to capture authentication cookies, If an attacker is on a wireless network he just needs to use a simple tool called firesheep in order to capture authentication cookie and gain access to victims account.
In the example below I will be explaining how an attacker can capture your authentication cookies and hack your facebook account with wireshark.
Step 1 - First of all download wireshark from the official website and install it.
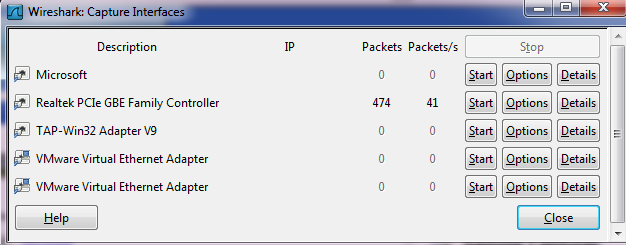
Step 2 - Next open up wireshark click on analyze and then click on interfaces.
Step 3 - Next choose the appropriate interface and click on start.
Step 4 - Continue sniffing for around 10 minutes.
Step 5 - After 10minutes stop the packet sniffing by going to the capture menu and clicking on Stop.
Step 6 - Next set the filter to http.cookie contains “datr” at top left, This filter will search for all the http cookies with the name datr, And datr as we know is the name of the facebook authentication cookie.

Step 7 - Next right click on it and goto Copy - Bytes - Printable Text only.

Step 8 - Next you’ll want to open up firefox. You’ll need both Greasemonkey and the cookieinjector script. Now open up Facebook.com and make sure that you are not logged in.
Step 9- Press Alt C to bring up the cookie injector, Simply paste in the cookie value into it.

Step 10 - Now refresh your page and viola you are logged in to the victims facebook account.

Note: This Attack will only work if victim is on a http:// connection and even on https:// if end to end encryption is not enabled.
Countermeasures
The best way to protect yourself against a session hijacking attack is to use https:// connection each and every time you login to your Facebook, Gmail, Hotmail or any other email account. As your cookies would be encrypted so even if an attacker manages to capture your session cookies he won't be able to do any thing with your cookies.
Subscribe to:
Comments (Atom)